DIY Backdrop Wall on Wheels: The Ultimate Studio Upgrade for $200

Video Source:
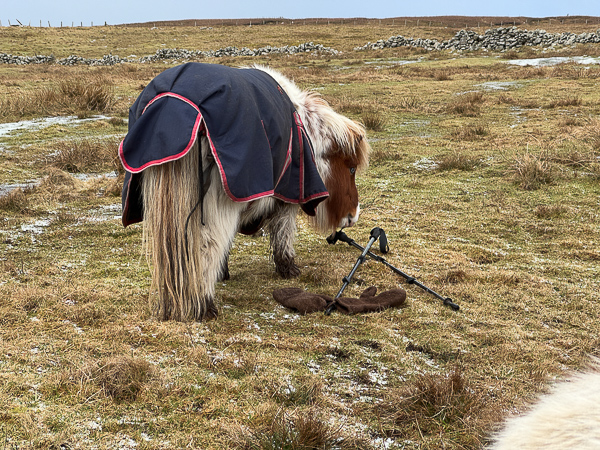
Building a DIY backdrop wall gives you professional studio flexibility without the expense of commercial systems. This rolling backdrop measures 3 meters wide by 2.6 meters tall, accommodating up to three people while remaining mobile enough to reposition throughout your studio. The dual-sided design provides two different backdrop colors, and adjustable wheels allow the wall to sit completely flush with the floor for seamless wide-angle photography.
Why Commercial Backdrop Walls Fall Short
Commercial backdrop systems cost $1,000-$3,000 and often lack the one feature that matters most: the ability to sit flush with the floor. Traditional backdrop stands, seamless paper systems, and even expensive mounted walls create visible gaps between the background and floor. These gaps destroy the illusion of a seamless environment and make wide-angle shots impossible without showing the transition.
A DIY backdrop wall on wheels solves this critical problem. The adjustable wheel system allows the wall to lower completely to the ground, creating a true floor-to-wall connection. You get professional results that commercial systems can’t deliver, at a fraction of the cost.
Planning Your DIY Backdrop Wall Size
Determine dimensions based on your studio space and shooting needs. This project uses a 3-meter width by 2.6-meter height, large enough for group shots of up to three people but compact enough to maneuver in a standard studio. Consider your ceiling height, available floor space, and typical subject arrangements when planning your DIY backdrop wall.
Larger dimensions provide more flexibility but reduce mobility. Smaller sizes move easily but limit shooting options. The 3×2.6 meter size represents a practical balance for most studio photography applications, including portraits, fashion work, and small group sessions.
Materials for Your DIY Backdrop Wall
Gather these materials before starting construction:
Frame Materials:
- Construction wood (2×4 or similar) for the main frame
- Cross braces (same construction wood)
- Wood screws for frame assembly
- 6 plaster boards (3 per side)
Mobility System:
- 4 heavy-duty adjustable wheels
- Triangle support structures for wheel mounting
- Mounting hardware for wheels
Finishing Materials:
- Joint compound for plastering
- Sandpaper (various grits)
- Primer
- Two colors of wall paint
- Paint rollers and brushes
Heavy-duty adjustable wheels are crucial for this DIY backdrop wall. They must support the weight of the frame and plaster boards while allowing height adjustment so the wall can be lowered to floor level. This feature is what separates your DIY backdrop wall from inferior commercial options.
Step 1: Build the Wooden Frame
Construct a rectangular frame from construction wood measuring 3 meters wide by 2.6 meters tall. Cut wood pieces to length and assemble them using wood screws. Create corners first, ensuring they’re square and sturdy. This frame provides the backbone for your DIY backdrop wall.
Use a level throughout assembly to keep the frame square. Uneven frames cause problems later when mounting plaster boards and affect how the finished wall sits on the floor. Take time to get measurements and angles correct during this foundational step.
Step 2: Add Cross Braces for Strength
Install cross braces throughout the frame to strengthen the structure and provide mounting points for plaster boards. Position braces vertically and horizontally across the frame interior. These prevent warping and give plaster boards a solid backing across their entire surface.
Space cross braces approximately every 60-80 centimeters for adequate support. The exact spacing depends on the plasterboard size and frame dimensions. More bracing creates a sturdier DIY backdrop wall but adds weight. Balance strength against mobility needs for your specific studio situation.

Video Source:
Step 3: Mount Plaster Boards on Both Sides
Attach three plaster boards to one side of the frame. Position boards carefully to minimize gaps between them. Screw boards directly to the frame and cross braces using appropriate fasteners. Plasterboard screws work best as they sit flush with the surface.
Repeat the process on the opposite side of the frame with three more plaster boards. This dual-sided construction gives your DIY backdrop wall two usable surfaces for different backdrop colors. The sandwich construction also adds rigidity to the overall structure, making it more durable than single-sided alternatives.
Step 4: Build Triangle Wheel Pedestals
Create triangular support structures on each side of the frame base. These triangles distribute weight from the frame to the wheels evenly. Build them from the same construction wood, creating stable bases that extend from the frame’s bottom.
The triangle design is crucial because it prevents the DIY backdrop wall from tipping when rolled. The wide base created by the triangle shape provides stability while maintaining a relatively compact footprint when the wall is stored upright.
Step 5: Install Heavy-Duty Adjustable Wheels
Attach four heavy-duty adjustable wheels to the triangle bases. Position wheels at the corners for balanced weight distribution. The adjustable height feature is critical – it allows you to raise the DIY backdrop wall for moving, then lower it completely to the floor for shooting.
This is the secret that makes your DIY backdrop wall superior to commercial systems. When lowered, the wall sits directly on the floor with no gap. When raised, you can roll it effortlessly to any position in your studio. Test the adjustment mechanism to ensure smooth operation before proceeding.

Video Source:
Step 6: Plaster and Blend the Joints
Fill gaps between plaster boards with joint compound. Apply compound with a putty knife, pressing it into seams and smoothing it flush with the board surface. This creates seamless transitions between boards so the finished wall appears as one continuous surface.
Allow the first coat of joint compound to dry completely. Apply additional coats as needed, feathering edges for smooth transitions. This plastering process takes patience but is essential for professional results on your DIY backdrop wall. Multiple thin coats work better than single thick applications that crack when drying.
Step 7: Sand to Perfection
Once the joint compound is completely dry, sand the entire surface smooth. Start with medium-grit sandpaper to level high spots and blend plastered seams. Progress to fine-grit sandpaper for a smooth finish, ready for painting.
Pay special attention to seams between plaster boards. These should be completely invisible after proper sanding. Run your hand across the surface to detect any remaining irregularities. Smooth surfaces photograph better and prevent shadows from uneven texture during studio lighting setups.
Wear a dust mask during sanding, as plaster dust is unhealthy to breathe. Work in a ventilated area and clean up dust thoroughly before painting.
Step 8: Prime for Perfect Paint Adhesion
Apply primer to both sides of your DIY backdrop wall. Primer seals the plasterboard surface, provides uniform absorption for paint, and improves final color accuracy. Use a roller for large areas and a brush for edges and corners.
Allow primer to dry according to the manufacturer’s specifications. Proper drying prevents paint problems later. Primed surfaces also reveal any remaining imperfections you can address before final painting. Touch up any rough spots with additional sanding before proceeding.
Step 9: Paint Both Sides Different Colors
Choose two different colors for your DIY backdrop wall sides. Select colors that complement skin tones and work with your typical photography style. Neutral colors like gray, beige, or muted earth tones provide versatility for various shoots.
Apply the first color to one side using a paint roller. Work in even strokes for uniform coverage. Allow the first coat to dry, then apply a second coat for full color saturation. Repeat the process on the opposite side with your second color choice.
Two coats of paint ensure solid color coverage without thin spots that show through in photographs. Quality paint designed for walls works best, providing durability against the inevitable bumps and scrapes of studio use.

Video Source:
Here’s where your DIY backdrop wall destroys commercial alternatives. When ready to shoot, lower the adjustable wheels until the wall sits completely on the floor. This floor contact eliminates the gap that ruins seamless backgrounds in most studios.
You can now shoot wide-angle portraits showing the floor-to-wall transition without visible seams or gaps. The solid contact also stabilizes the wall, preventing movement during shoots. Models can even lean against it without the wall shifting.
When finished shooting, raise the wheels to lift the DIY backdrop wall off the floor. Roll it to storage or reposition it for the next setup. The mobility transforms how you use studio space, allowing quick changes between different shooting scenarios.
Color Selection Strategy
Choose backdrop colors that work with your primary photography subjects. Neutral tones provide maximum versatility for portrait work. Skin tones photograph well against grays, taupes, and muted earth colors. These colors don’t cast color spills onto subjects like bright or saturated backgrounds might.
Consider having one neutral side and one accent color side. The neutral side handles general shooting while the accent color provides creative options for specific projects. Popular combinations include gray and beige, white and charcoal, or taupe and sage green.
Test colors with your typical lighting setup before committing to large quantities of paint. Small sample boards help visualize how colors will photograph under your studio lights. What looks good to the eye doesn’t always photograph the same way.
Using Your DIY Backdrop Wall for Maximum Impact
Position your rolling backdrop wall anywhere in the studio. The wheels make repositioning easy for different lighting arrangements or to accommodate various shooting spaces. Experiment with placement to find optimal positions for your typical setups.
The dual-sided design means you can flip the wall to change backdrop colors in seconds. No need to change paper backdrops, swap out cloths, or rearrange your studio. Simply rotate the DIY backdrop wall 180 degrees, and you have a completely different look.
For group shots, position subjects directly against the wall. The seamless floor connection means you can shoot from low angles without showing the typical backdrop stand legs or gaps. This opens up creative composition options impossible with traditional backdrops.
Maintenance and Long-Term Care
Inspect your DIY backdrop wall periodically for damage. Touch up paint as needed to maintain a clean appearance. Scuff marks and scratches happen with regular studio use, but quick touch-ups keep the wall looking professional.
The plasterboard surface repairs easily if damaged. Fill holes or dents with joint compound, sand smooth, and repaint the affected area. This repairability makes your DIY backdrop wall a long-term studio investment rather than disposable equipment.
Change colors whenever your photography style evolves, or the client’s needs shift. Simply sand the existing paint lightly, apply fresh primer, and paint new colors. The solid construction supports unlimited repainting without degradation.
Storage and Space Management
When not in use, roll your DIY backdrop wall to a storage location against a studio wall. The relatively compact footprint when standing upright minimizes floor space consumption. The dual-sided design means one wall provides two backdrop options, reducing the number of backdrops needed in your studio.
If you have limited storage space, the vertical orientation works perfectly. The wall stands against any available wall without taking up valuable floor area. Lock the wheels when stored to prevent accidental rolling.
Consider building multiple backdrop walls in different sizes for various applications. Smaller versions work for product photography while larger versions handle full-body portraits. The construction process remains identical regardless of dimensions.
Why This Beats Commercial Systems
Commercial backdrop systems with a comparable size cost $1,000-$3,000. Most still create that problematic floor gap. Your DIY backdrop wall solves this issue while costing around $200 in materials. That’s 80-90% savings for superior functionality.
The dual-sided color design provides twice the versatility of single-color commercial backdrops. The adjustable wheels enable the crucial floor contact that expensive systems can’t match. The solid construction rivals or exceeds commercial quality when built properly.
You also gain the ability to customize dimensions precisely for your space. Commercial backdrops come in fixed sizes that might not fit your studio perfectly. Your DIY backdrop wall fits exactly where and how you need it.
Professional Photography on a DIY Budget
Creating a rolling DIY backdrop wall gives you studio equipment that outperforms commercial options costing ten times more. The seamless floor contact enables professional photography techniques impossible with traditional backdrop systems. The dual-sided color design doubles your backdrop options without doubling your space requirements.
The mobility transforms the studio workflow, allowing quick reconfigurations for different shoots. You gain the flexibility to adapt your space rather than working around fixed backdrops. This DIY backdrop wall proves that smart construction and quality materials create professional tools that rival anything you can buy.