Building a DIY photography prop box gives you a versatile pedestal for posing models, displaying products, and creating dynamic compositions in your studio. Commercial prop boxes cost $200-400, but you can build your own custom photography prop box for around $100 using materials from your local hardware store. This DIY project takes a few hours and results in a professional 24×24-inch pedestal that supports various weights and adapts to different shooting needs.
Why Build Your DIY Photography Prop Box
A photography prop box serves multiple purposes in the studio. Models can sit or stand on it for different posing angles, products display at ideal heights, and you gain creative flexibility for portrait photography and commercial work. The ability to customize dimensions means you build exactly what your shooting style requires.
This modular design allows you to change the height by adding or removing sections. Start with a 2-foot-tall photography prop box, then build additional modules to create a 3-foot version when needed. The removable top also provides storage space inside for lights, modifiers, or other equipment when the box isn’t in use.
Materials for Your DIY Photography Prop Box
Purchase these materials from your local Home Depot or hardware store:
Wood:
3 pieces of plywood (24″ x 24″, 3/4″ thick)
2 pieces of plywood (24″ x 22.5″, 3/4″ thick)
Hardware:
Wood screws (shorter than 3/4″ board thickness)
Metal angle brackets (plan for 2-3 per corner)
Screws for angle brackets
4 wooden dowel pins (1/4″ diameter)
Tools:
Power drill with Phillips head bit
Drill bits (including 1/4″ for dowel holes)
Tape measure
Marker
Sandpaper
Hammer and nails (alternative to a drill)
Finishing:
White gloss spray paint with primer
Optional: plastic wood filler
Total cost: Approximately $100 for all materials and tools if you don’t already own basic equipment.
DIY Photography Prop Box Wood Dimensions
This DIY photography prop box uses specific dimensions to create a perfect 24×24 inch square. Three pieces measure 24×24 inches, while two pieces measure 24×22.5 inches. This difference accounts for board thickness when assembling the box.
When you place a 22.5-inch board between two 24-inch boards, the total length becomes 24 inches (22.5″ + 0.75″ + 0.75″ = 24″). This ensures all sides measure exactly 24 inches square. The shorter pieces sit on top of the longer pieces during assembly, maintaining proper dimensions throughout.
Alternative Design for Seamless Look
If you want a seamless DIY photography prop box where the top isn’t visible, modify the design slightly. Purchase four 2×4 boards cut to 22 inches in length. Mount these inside the box perimeter as support ledges. Cut your top piece to 22.5×22.5 inches so it sits inside the frame on these ledges rather than on top of the box.
This creates a flush appearance where you don’t see the top edge. The trade-off is losing the modular capability of easily removing the top. Choose based on whether you prioritize appearance or functionality for your DIY photography prop box needs.
Before drilling, mark where the screws will go. Place three screws evenly spaced along each edge where boards connect. Measure and mark at 6 inches, 12 inches, and 18 inches from the edge. This creates even distribution along the 24-inch length.
Also, mark the depth positioning. Since boards are 3/4 inch thick, mark at approximately 3/8 inch from the edge. This helps keep the screws centered within the board’s thickness, preventing them from breaking through either surface. Accurate marking ensures your photography prop box assembles properly.
Step 2: Attach Angle Brackets
Before joining boards together, attach angle brackets to the inside corners. Position brackets where two boards will meet. Use screws shorter than your board thickness to attach brackets. Remember that 3/4 inch boards require screws no longer than 3/4 inch, or they’ll poke through the surface.
Place at least two angle brackets per corner. For additional support, use three brackets per corner since they cost only about 50 cents each. The extra reinforcement matters when your photography prop box supports heavier models or equipment during studio sessions.
Step 3: Assemble the First Two Boards
Take one 24×24-inch board and one 22.5×24-inch board. The shorter board sits on top of the longer board’s edge, not beside it. This maintains the 24-inch total dimension. Position the boards at a right angle and drill pilot holes through your marked positions.
Drive screws through the pilot holes to connect the boards. The angle brackets you installed provide interior support, while the screws provide exterior joining strength. This dual attachment method creates a strong corner for your photography prop box.
Connect the third board to create an L-shape with two boards attached. Then add the fourth board to complete the square frame. Throughout assembly, verify that shorter boards (22.5 inches) sit on top of longer boards (24 inches) to maintain proper dimensions.
After joining all four sides, measure the frame to confirm it’s 24×24 inches on all sides. Check both top and side measurements. This verification ensures your top piece will fit properly and your DIY photography prop box maintains its square shape.
Step 5: Validate Your Measurements
Double-check measurements before proceeding. The frame should measure exactly 24 inches in both directions. If measurements are off, the 24×24 inch top piece won’t sit flush. Take time to verify dimensions now rather than discovering problems later.
Place the top piece on the frame to test the fit. It should rest evenly across all edges without gaps or overhangs. If fit isn’t perfect, identify which board is misaligned and adjust before final assembly.
Step 6: Create Dowel Pin Holes for Modular Top
For a removable top that allows height modifications, use dowel pins instead of screws. Mark the center point on two opposite sides of your frame’s top edge. This is 12 inches from either end. Also mark 3/8 inch from the outer edge to center the hole in the board thickness.
Drill pilot holes at these marks using a smaller drill bit first. This guides the larger 1/4 inch bit that creates the actual dowel holes. Drill carefully to keep holes perpendicular to the board surface. Repeat the process on the corresponding spots on the underside of your top piece.
Step 7: Install Dowel Pins
Cut wooden dowel pins to the appropriate length. You need enough length to extend into both the frame and the top piece, roughly 1.25 inches total. Insert dowel pins into the holes on the frame. They should fit snugly but not so tightly that they’re impossible to remove.
Test fit the top piece by aligning its holes with the protruding dowel pins. The top should seat firmly onto the pins. This connection holds the top in place during use, especially with a model’s weight pressing down, but allows you to lift it off when needed.
If you don’t want a modular DIY photography prop box, skip the dowel pins and simply screw or bracket the top permanently to the frame. Use angle brackets mounted inside the box, attaching them to both the frame and the underside of the top piece.
Step 8: Sand All Edges
Before painting, sand every edge of your DIY photography prop box. Pay special attention to corners and edges where models might sit or lean. Sharp edges can snag clothing or scratch skin, so round them off with medium-grit sandpaper.
Sand in smooth, even strokes along each edge. You don’t need to remove much material, just enough to eliminate sharp corners. This safety step takes only 10-15 minutes but prevents accidents during photoshoots.
Step 9: Apply Primer and Paint
Work in a controlled environment rather than outdoors. Wind wastes spray paint and creates uneven coverage. A garage or covered area works better. Use white gloss spray paint that includes primer, or apply separate primer first, then paint.
Apply thin, even coats rather than trying to cover everything in one pass. Hold the spray can about 12 inches from the surface and use smooth, overlapping strokes. Allow each coat to dry completely before adding the next. Plan for at least two to three coats for full coverage on your photography prop box.
Pay attention to corners and edges where paint tends to pool. Multiple thin coats create better results than single thick coats that drip and run. The gloss finish gives your photography prop box a professional appearance that photographs cleanly.
Use solid wood boards rather than plywood if possible. Plywood consists of thin layers glued together, making it harder to drill and screw accurately. Solid wood accepts fasteners more reliably and creates stronger joints for your DIY photography prop box.
If the visible top edge bothers you, fill gaps with plastic wood filler before painting. Sand the filler smooth once dry, then paint over it. Alternatively, remove the top edge in post-production using Photoshop’s clone stamp tool. This takes seconds and eliminates the need for additional construction work.
Add extra angle brackets beyond the minimum. At 50 cents each, the cost is negligible, but the added support significantly strengthens your photography prop box. Consider three brackets per corner instead of two, especially if you’ll be photographing heavier subjects.
Paint in a controlled environment to avoid waste and achieve better coverage. Outdoor painting loses product to wind and creates uneven coats. A garage or covered workspace provides the control needed for professional results.
Using Your DIY Photography Prop Box
Position your completed photography prop box anywhere in your studio for creative compositions. Models can sit on it for portraits, products can be displayed at ideal heights for tabletop photography, or it can be used as a platform for fashion shoots.
The white finish reflects light cleanly and doesn’t introduce color casts. This neutral surface works with any backdrop or lighting setup. The 24-inch square top provides ample space for various poses and products.
For added versatility, build multiple modules at different heights. Stack them to create taller pedestals or use them separately throughout your studio. The modular design means you adapt to different shooting scenarios without buying multiple fixed-height boxes.
Storage Benefits
The removable top transforms your DIY photography prop box into storage when not in use. Store RGB lights, small light modifiers, cables, or other equipment inside the hollow frame. This maximizes studio space efficiency by giving equipment a dedicated storage spot that doubles as a functional prop.
The sturdy construction supports storage weight without issue. Simply lift the top, place items inside, and replace the top. Your photography prop box maintains a clean exterior appearance while organizing gear internally.
Customization Options
Paint your DIY photography prop box any color to match your studio aesthetic or specific shoot requirements. Black creates dramatic contrast, gray offers neutral tones, or use custom colors for branded commercial photography. The modular design accepts any spray paint finish.
Build boxes in different dimensions for varied applications. Smaller boxes work for product photography, while larger versions accommodate full-body posing. The construction process remains identical regardless of size – just adjust your wood dimensions accordingly.
Build Your Studio Essential
Creating a DIY photography prop box for around $100 gives you a professional studio tool that rivals commercial options costing several times more. The customizable design adapts to different shooting needs, the sturdy construction supports various weights, and the modular top allows height adjustments as your requirements change.
This project demonstrates that professional studio equipment doesn’t require professional budgets. With basic materials from the hardware store and a few hours of work, you gain a versatile pedestal that enhances portrait sessions, product shoots, and creative compositions. Your photography prop box proves that thoughtful DIY solutions deliver professional results.
We use cookies to ensure that we give you the best experience on our website. If you continue to use this site we will assume that you are happy with it.
With cats as pets, every pet owner has to be extra cautious, as they can open many things easily and do as they wish. Even this owner has to take some precautions to prevent her food from spoiling because of her Orange cat. Seeing how easily the feline opens the door, the mom had to put a child lock on their freezer to keep things safe. The clip surely resonated with many cat owners as it received a lot of attention online, garnering more than 4k likes at the time of writing.
Cat apparently opens the freezer using her paws
Does your cat open your freezer? If so, what precaution did you take to prevent your feline from doing so? Even this Orange cat named Miss Mayonnaise can easily open the freezer. As a result, the cat owner came up with a solution that left many in stitches.
Talking about her “Canadian mainecoon girl with thumbs” on @mayothemainecoon, the mom explained that despite being “child free,” they “need child locks on everything,” as their feline “goes on top of the freezer and she opens the freezer with her thumbs and she defrosts” off of their “meat.”
Hence, as a precaution, they had to use this safety device to prevent their food from spoiling. While the mom seems relieved with the solution, Miss Mayo does not seem happy with it, as she sits on the freezer, trying her best to understand the reason for the lock.
However, looking at the things her feline can do, the mom expressed her worry in the caption saying, “This is what happens when you live with an orange cat with thumbs. Soon she will be driving our vehicles and doing our taxes.”
Nevertheless, many cat owners have found this video relatable, as one pet parent said, “Which lock is that? My girl chewed through the strap style lock I had on my fridge and steals me food all the time.” While another cat owner mentioned, “My gingy, Fred, also opens doors, cabinets, drawers, dishwasher and the freezer. Certified orange.”
We use cookies to ensure that we give you the best experience on our website. If you continue to use this site we will assume that you are happy with it.
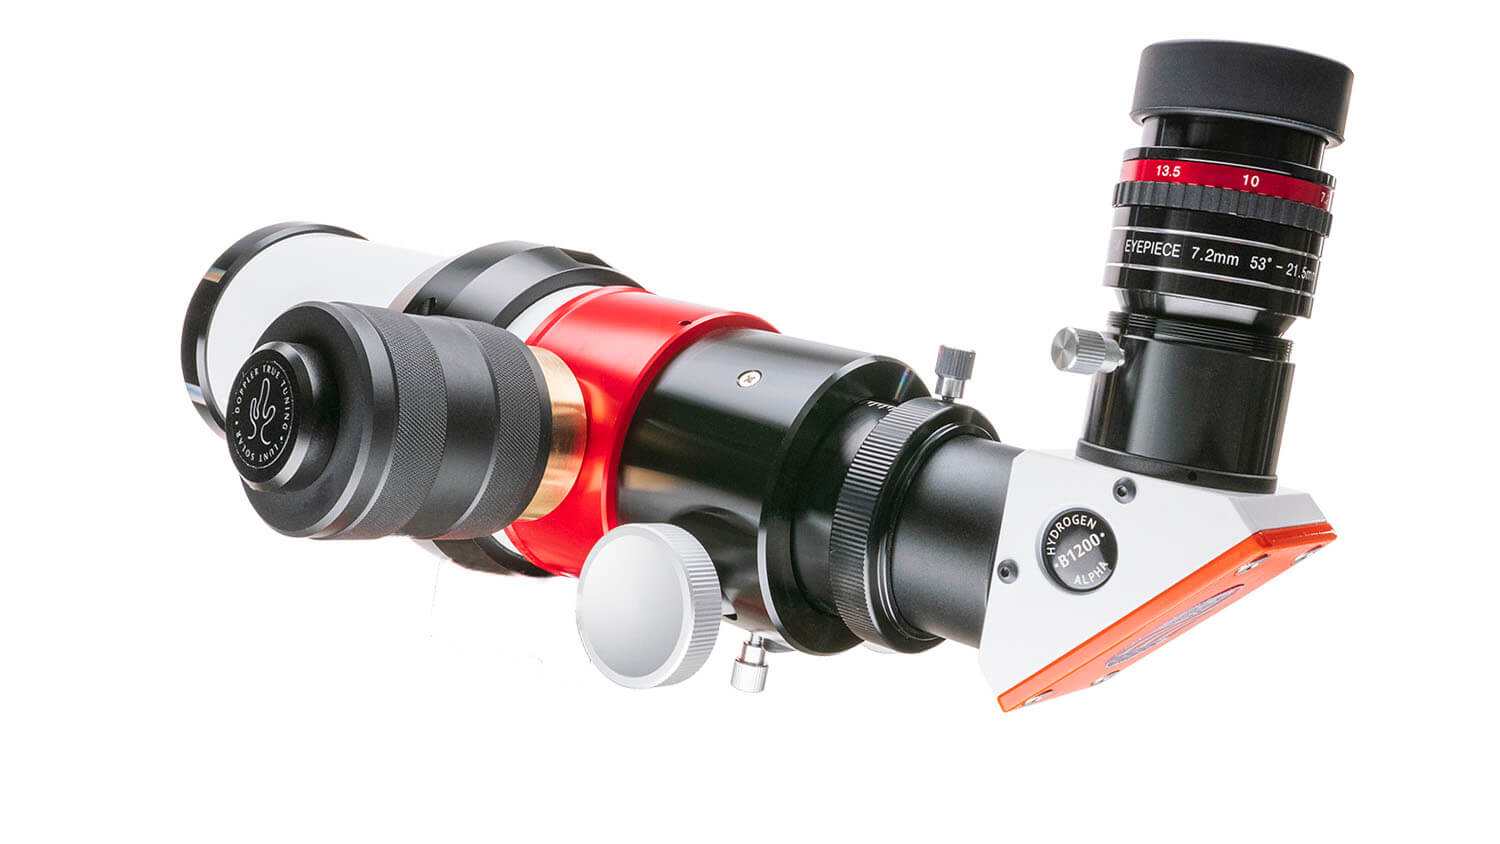
Hydrogen-alpha solar telescopes have traditionally served a single purpose. Most instruments in this category focus exclusively on daytime chromospheric work. As a result, observers often maintain separate optical systems for solar and nighttime astronomy. The Lunt 60 mm Universal Telescope, widely known as the LS60MT, combines a pressure-tuned H-alpha system with a removable solar module inside a compact ED refractor platform.
Lunt Solar Systems developed the LS60MT to function as a convertible optical system rather than a fixed solar tube. The telescope operates as a dedicated hydrogen-alpha instrument when configured for solar work. However, it transforms into a conventional ED refractor once the solar components are removed. That dual-mode capability defines the instrument’s position in the current amateur solar market. The LS60MT occupies the mid-aperture segment of Lunt’s universal series. It balances portability, optical quality, and modular expansion. Consequently, it appeals to observers who want serious solar capability without committing to a large, single-purpose system.
Optical design
The LS60MT is built around a 70 mm ED doublet objective. Lunt specifies FPL-51 class glass for the primary element. This choice reduces chromatic aberration and preserves contrast across the visible spectrum. The telescope has a focal length of 420 mm and a focal ratio of f/7. These parameters place it firmly in the short refractor category.
Lunt LS60MT universal telescope
In nighttime configuration, the telescope uses the full 70 mm aperture. When configured for hydrogen-alpha work, the effective working aperture becomes 60 mm. This reduction results from the internal solar module geometry and energy rejection system.
Lunt applies ion-assisted broadband anti-reflection coatings to the objective surfaces. These coatings improve transmission efficiency and suppress stray reflections. As a result, the optical path remains clean in both solar and nighttime modes.
The internal etalon is tuned precisely to the hydrogen-alpha wavelength of 656.28 nm. In single-stack configuration, the system achieves a bandpass below 0.65 Å. With the optional double-stack module installed, the bandpass tightens to below 0.45 Å. These figures place the LS60MT firmly within the serious amateur solar imaging class. The telescope’s recommended maximum magnification is approximately 100×.
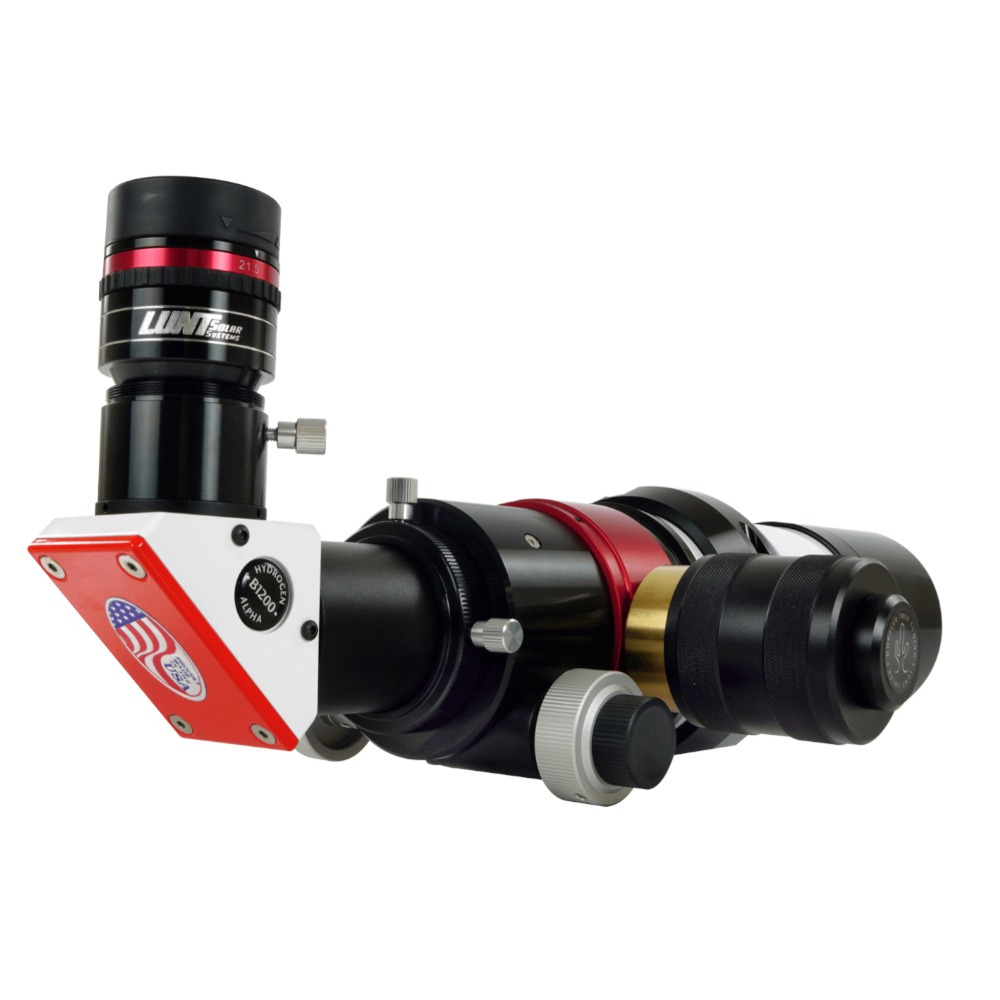
The telescope has an aperture of 70mm for nighttime and 60mm for solar imaging
Universal configuration and multi-mode operation
The defining characteristic of the LS60MT is its universal observing capability. Lunt designed the telescope as a modular platform that supports solar and nighttime modes. The transition between modes occurs through the removal or installation of dedicated optical modules.
In the hydrogen-alpha configuration, the telescope functions as a dedicated solar instrument. The internal etalon and blocking filter isolate the narrow H-alpha bandpass. This allows observers to examine prominences, filaments, plages, and chromospheric surface detail with high contrast.
Once the solar module is removed, the optical tube behaves like a conventional ED refractor. At that stage, the telescope supports lunar observation, planetary viewing, and wide-field deep-sky imaging. The 420 mm focal length makes it particularly suitable for large nebulae and star fields.
The LS60MT also supports Calcium-K solar observing at 393.4 nm with an approximate 2.2 Å bandpass. This wavelength probes a different solar layer than hydrogen-alpha. As a result, users can study complementary solar structures. White-light solar observation remains another supported mode. Observers can use either a front-mounted solar film filter or a white-light wedge to monitor sunspots and photospheric detail. This multi-mode capability transforms the LS60MT into a genuinely flexible solar platform.
Nighttime deep sky images taken with Lunt LS60MT (via Lunt Solar Systems)
Pressure tuning and etalon control
A major technical feature of the LS60MT is Lunt’s Doppler True pressure tuning system. Instead of tilting the etalon to shift the wavelength, the telescope adjusts the internal air pressure surrounding the etalon cavity. This method provides more uniform spectral performance across the field.
Tilt-tuned systems often produce a sweet spot where contrast peaks in one region of the field. Pressure tuning reduces this effect. Consequently, the solar disk appears more evenly illuminated during both visual observation and imaging.
The tuning mechanism allows precise adjustment around the hydrogen-alpha line center. Observers can slightly offset the tuning to emphasize either prominences or surface contrast. The pressure system responds immediately to adjustments, which makes fine-tuning straightforward in the field.
The etalon itself uses UV-grade fused silica. This material offers excellent thermal stability under sustained solar exposure. Stability matters because even small thermal shifts can affect bandpass accuracy. Lunt’s material choice helps maintain consistent performance during extended solar sessions.
The etalon used in the telescope is pressure-tuned
Blocking filters and system configurability
Lunt designed the LS60MT as a configurable system. Buyers can select among several blocking filter sizes, typically 6 mm, 12 mm, or 18 mm. The blocking filter determines the fully illuminated field at the focal plane. Smaller blocking filters work well for visual observing. Larger filters benefit imaging applications and wide-field eyepieces. For example, a 12 mm or 18 mm blocking filter reduces vignetting when paired with modern solar cameras.
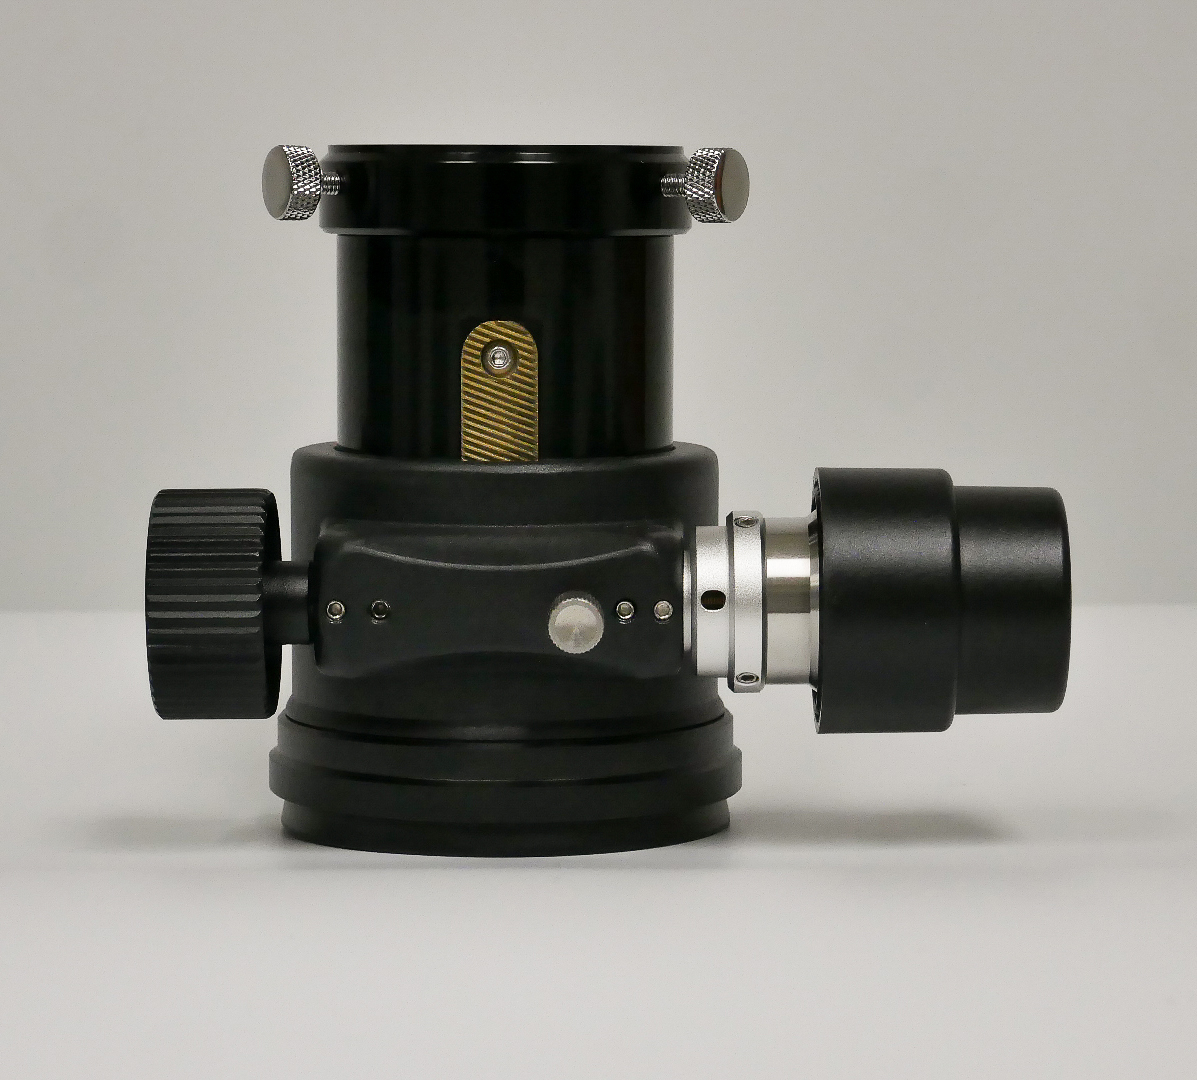
The focuser assembly is also configurable. Lunt offers dual-speed rack-and-pinion and Feather Touch options. Each version includes fine-focus reduction, typically around 10:1. This level of control becomes critical during high-resolution solar imaging.
Dual-speed rack-and-pinion focuser
Another important upgrade path involves double-stacking. Adding a second etalon narrows the bandpass below 0.45 Å. This significantly increases chromospheric contrast and suppresses continuum leakage. Many experienced solar observers eventually adopt this configuration to extract finer surface detail.
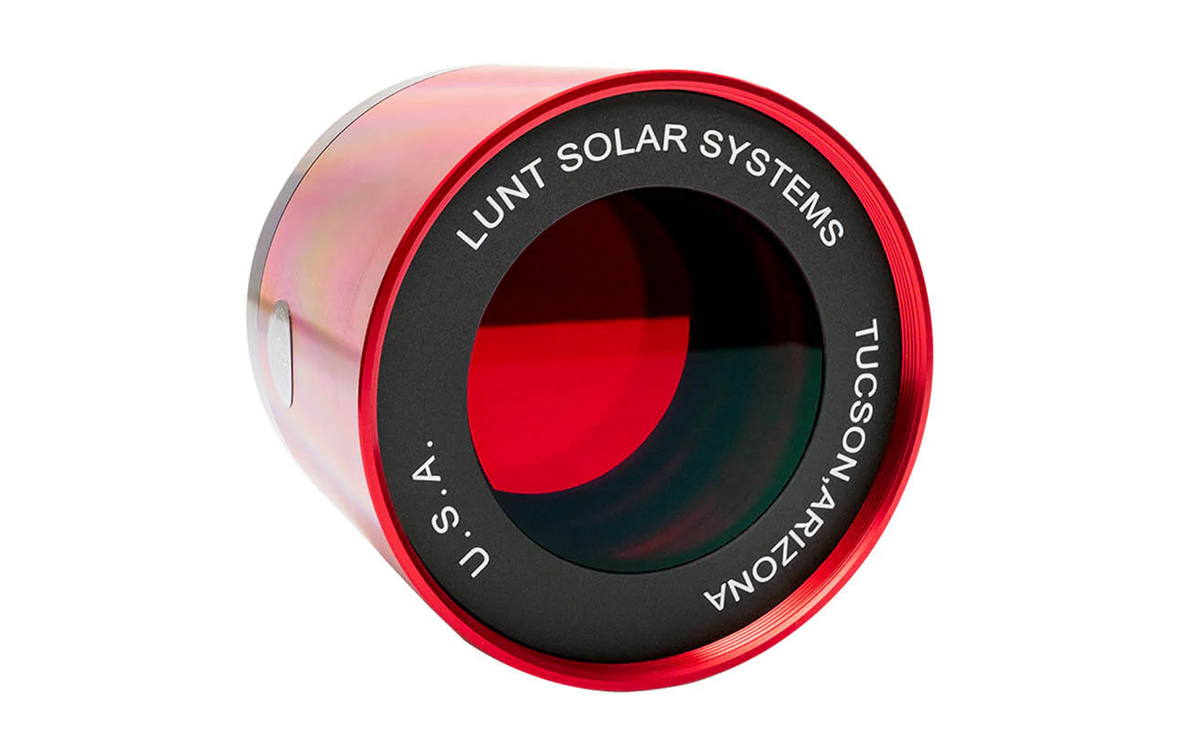
The telescope ships with a CNC-machined clamshell and a Vixen-style dovetail plate. This arrangement ensures compatibility with most modern mounts without requiring custom hardware.
Lunt LS60FHa Front Mount 60 mm Double Stack Filter
Key specifications, price, and availability
Here are some of the key specifications of the Lunt LS60MT:
Telescope Type
Universal Day and Night
Universal Capabilities
H-alpha, CaK, White Light, Lunar, Planetary, Deep Space, Terrestrial
Aperture
70 mm Native, 60 mm H-alpha
Objective Type
Professional Grade ED Doublet
Objective Material
FLP51
Objective Coating
Ion Assist Broadband AR
Focal Ratio
F/7
Focal Length
420 mm
H-alpha Etalon Type
Modular
Etalon Wavelength
656.28 nm
Etalon Bandpass
<0.65 Å Single Stack, <0.45 Å Double Stack
Telescope Weight
~7lbs
Theoretical Max Magnification
100 x
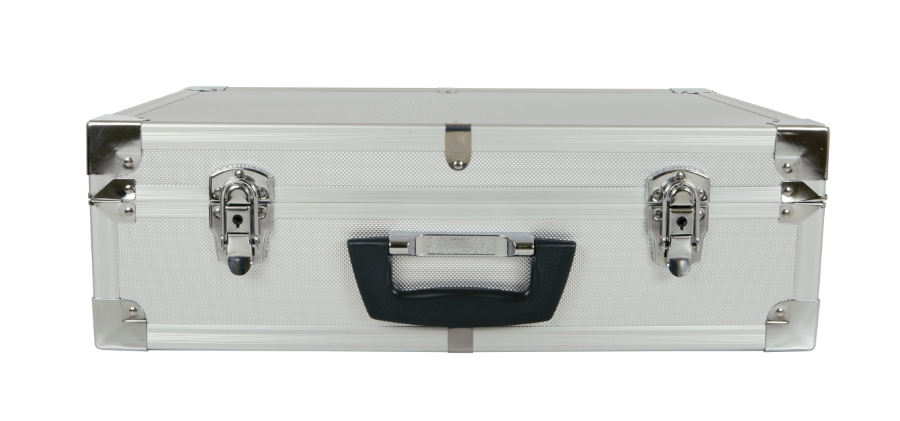
Lunt supplies the instrument in a fitted aluminum hard case. The foam interior protects the etalon and optical components during transport. Given the precision nature of hydrogen-alpha systems, proper storage remains essential.
The telescope is shipped in an aluminum hard case
The Lunt LS60MT is priced at $1,998 (OTA only). It is available with a B600 Blocking Filter ($2,393 for OTA + Blocking Filter) and with a B1200 Blocking Filter ($2,543 for OTA + Blocking Filter).
Lunt also offers multiple accessories, including double-stack units, white light solar wedges, Calcium K module, Sun Finders, eyepieces, and Feather Touch focuser, all of which can be bought separately or together with the telescope.
Within Lunt’s broader lineup, the LS60MT occupies a middle position in the universal telescope series. It offers more capability than entry-level solar scopes while remaining far more portable than larger dedicated instruments. The telescope targets observers seeking serious hydrogen-alpha performance in a travel-friendly format. Its modular architecture also appeals to users who prefer incremental system upgrades.
The Two Best High-End Cameras From Nikon – The Phoblographer
Subscribe here for an ad-free experience!
We use cookies to ensure that we give you the best experience on our website. If you continue to use this site we will assume that you are happy with it.
As responsible pet owners, we always strive to provide the best care for our furry, feathered, or scaled companions. But even with the most diligent care, accidents and emergencies can happen. Having a well-stocked pet first aid kit readily available is essential for addressing minor injuries and providing immediate care until you can reach a veterinarian.
This guide will walk you through building a comprehensive pet first aid kit, covering essential items, their uses, and vital wound care knowledge. Equipping yourself with this knowledge and the right supplies can make all the difference in an emergency situation.
Is Your Pet Ready for the Unexpected? The Importance of a First Aid Kit (2026)
Why Every Pet Owner Needs to Be Prepared
Just like humans, pets are susceptible to injuries, illnesses, and unexpected emergencies. Being prepared with a well-equipped first aid kit allows you to provide immediate care and potentially stabilize your pet until you can seek professional veterinary attention. A delay in treatment, even a short one, can sometimes have significant consequences. Whether it’s a minor cut, an allergic reaction, or a sudden illness, having the right tools and knowledge can empower you to act quickly and effectively. Consider it part of your Essential Pet Supplies Checklist: Never Run Out Again, a vital component of responsible pet ownership. Furthermore, knowing how to administer first aid can help calm your pet, reducing stress and anxiety during a traumatic event, which in turn can make it easier for your vet to provide the necessary treatment.
Common Pet Emergencies at Home and On-the-Go
Pet emergencies can range from minor to life-threatening. At home, common incidents include cuts and scrapes, burns from hot surfaces, ingestion of toxic substances, allergic reactions to food or insect bites, choking, and gastrointestinal upset. When you’re out and about, your pet may encounter hazards like car accidents, encounters with other animals, paw injuries from rough terrain, heatstroke, or drowning. Knowing how to respond to each type of emergency is critical. For example, for suspected poisoning, immediately contacting the ASPCA Animal Poison Control Center (or your local emergency vet) is crucial. Learn how to recognize the early warning signs of a serious condition, such as difficulty breathing, excessive bleeding, loss of consciousness, or seizures. Refer to resources like our blog post “Is My Pet Sick? Early Warning Signs You Should Know” for details.
Peace of Mind: Knowing You Can Help
Beyond the practical benefits, having a pet first aid kit provides immense peace of mind. Knowing that you’re prepared to handle a medical situation, no matter how small, can alleviate anxiety and empower you to act confidently and decisively. This peace of mind is invaluable, especially when you’re traveling with your pet or living in an area with limited access to veterinary care. Being proactive in preparing for potential emergencies demonstrates your commitment to your pet’s well-being and strengthens the bond you share. The confidence that comes with knowing how to clean a wound or stabilize a fracture can be incredibly reassuring. It translates to your pet feeling more secure as well, as they sense your calm and capable presence in a stressful situation.
Building Your Pet’s Essential First Aid Kit: A Comprehensive Checklist
Wound Care Essentials: Cleansing, Bandaging, and Antiseptics
A primary focus of your kit should be wound care. Include: Sterile saline solution for flushing wounds (avoid hydrogen peroxide as it can damage tissue). Non-stick sterile gauze pads in various sizes for covering wounds. Self-adhering bandage wrap (like Vetrap) for securing dressings. First aid tape (hypoallergenic) to keep bandages in place. Povidone-iodine solution (diluted to a weak tea color) for antiseptic cleaning. Consider adding a blood stop powder or styptic pencil for minor bleeding from nail trims. When choosing antiseptics, avoid products containing alcohol or chlorhexidine in high concentrations, as these can be irritating to sensitive skin. Make sure to have blunt-tipped scissors to cut bandages, avoiding skin injury, and gloves to maintain sterility. Always check expiration dates regularly and replace items as needed to guarantee their effectiveness when you need them most.
Gastrointestinal Support: Activated Charcoal and Anti-Diarrheal Medications
Gastrointestinal issues are common in pets. Your kit should include: Activated charcoal, useful for absorbing certain toxins if your pet ingests something harmful (consult your vet immediately before administering; dosage varies by weight). An anti-diarrheal medication specifically formulated for pets (again, consult your vet for appropriate dosage). Electrolyte solution or powder to help prevent dehydration if your pet is vomiting or has diarrhea. A bulb syringe or oral syringe for administering medications. Avoid giving human medications without veterinary guidance, as many are toxic to animals. Keep a record of your vet’s recommended dosages for these medications in your kit for quick reference. Consider adding canned pumpkin (plain, not pie filling) to your kit as it can help with both diarrhea and constipation in small amounts (consult your vet for appropriate usage). If your pet has known sensitivities or allergies, include any prescribed medications for managing those conditions.
Tools and Instruments: Thermometer, Tweezers, and Scissors
The right tools make a big difference. Your kit should include: A digital rectal thermometer (specifically for pets; lubricate with petroleum jelly before use). Normal temperature for dogs and cats is 100.5-102.5°F (38.1-39.2°C). Round-tipped tweezers for removing splinters, ticks, or debris. Blunt-nosed scissors for cutting bandages and removing fur around wounds. A clean towel or blanket for restraint and warmth. A muzzle (for dogs) to prevent biting if they are in pain (only use if they can breathe freely). A flashlight or penlight for examining wounds or injuries in dimly lit areas. Also, keep a small notebook and pen for recording vital signs, medications administered, and observations to share with your veterinarian. A magnifying glass can be helpful for examining small wounds or foreign objects. Lastly, remember to include your veterinarian’s contact information and the number for a local emergency veterinary clinic.
Wound Care 101: What Every Pet Owner Should Know
How to Properly Clean a Wound: Step-by-Step Guide
1. **Safety First:** If your pet is in pain or agitated, muzzle them (if appropriate and safe) or use a towel to restrain them to prevent biting or scratching. 2. **Assess the Wound:** Determine the severity of the wound. If it’s deep, bleeding profusely, or involves a joint, seek immediate veterinary care. 3. **Stop the Bleeding:** Apply direct pressure to the wound using a clean gauze pad. Maintain pressure for several minutes until the bleeding slows or stops. 4. **Clean the Wound:** Gently flush the wound with sterile saline solution to remove debris and contaminants. Avoid using hydrogen peroxide, as it can damage tissue and delay healing. 5. **Antiseptic Application:** Dilute povidone-iodine solution with water until it resembles weak tea and gently apply it to the wound using a clean gauze pad. 6. **Drying:** Pat the area dry with a clean gauze pad. Avoid rubbing, as this can irritate the wound. 7. **Bandaging:** Apply a non-stick sterile gauze pad to the wound and secure it with self-adhering bandage wrap. Ensure the bandage is snug but not too tight, as this can restrict circulation. Change the bandage daily or as needed to keep the wound clean and dry. Monitor the wound for signs of infection (redness, swelling, pus, pain).
Different Types of Bandages and When to Use Them
Understanding bandage types is critical for effective wound care. A **protective bandage** is a simple covering to keep a wound clean. A **pressure bandage** helps control bleeding and swelling (apply carefully to avoid cutting off circulation). A **support bandage** provides stability for injured limbs (requires veterinary guidance to apply correctly). A **cast** is used for fractures (always applied by a vet). The **figure-eight bandage** is ideal for joint support but needs practice to apply effectively. The **modified Robert Jones bandage** provides strong support and compression for limb injuries (requires training to apply correctly). Always use non-stick dressings directly on the wound to prevent pain and tissue damage when removing the bandage. Ensure bandages are changed regularly (usually daily) and that the skin underneath remains healthy. Watch for signs of irritation, such as redness, swelling, or excessive licking, which may indicate the bandage is too tight or the wound is infected. Seek veterinary advice for proper bandaging techniques and bandage selection.
Recognizing Signs of Infection and When to Seek Veterinary Care
Even with proper wound care, infections can still occur. Be vigilant for the following signs: Increased redness and swelling around the wound. Pus or discharge (especially if it’s thick, colored, or foul-smelling). Increased pain or sensitivity to the touch. Fever (temperature above 102.5°F or 39.2°C). Lethargy or loss of appetite. Swollen lymph nodes near the wound. Delayed healing. If you notice any of these signs, it’s crucial to seek veterinary care promptly. Untreated infections can spread and lead to serious complications. Your veterinarian may prescribe antibiotics or other medications to combat the infection. They may also need to debride the wound (remove dead or infected tissue) to promote healing. Remember, early intervention is key to preventing serious consequences and ensuring your pet’s speedy recovery. If you have any concerns about a wound, don’t hesitate to consult your veterinarian, even if it seems minor.
Medications: Pain Relief and Anti-Inflammatories (Consult Your Vet First!)
The Dangers of Human Medications for Pets
It’s crucial to understand that many human medications are toxic to pets. Never administer any medication to your pet without first consulting your veterinarian. Common pain relievers like ibuprofen (Advil, Motrin) and naproxen (Aleve) can cause severe stomach ulcers, kidney damage, and even death in dogs and cats. Acetaminophen (Tylenol) is extremely toxic to cats, causing liver damage and red blood cell destruction. Even seemingly harmless medications like aspirin can be dangerous if not dosed correctly or if given to pets with certain underlying conditions. Antidepressants, cold and flu medications, and even some herbal supplements can also be harmful to pets. Always keep medications securely stored out of your pet’s reach and never leave pill bottles unattended. If you suspect your pet has ingested a human medication, contact your veterinarian or the ASPCA Animal Poison Control Center immediately.
Safe and Effective Pain Management Options for Dogs and Cats (Prescription Only)
If your pet requires pain relief, your veterinarian can prescribe safe and effective medications specifically formulated for animals. Non-steroidal anti-inflammatory drugs (NSAIDs) like carprofen (Rimadyl), meloxicam (Metacam), and firocoxib (Previcox) are commonly used to manage pain and inflammation in dogs and cats. These medications are generally safe when used as directed by your veterinarian, but they can have potential side effects, such as gastrointestinal upset or kidney damage. Opioid pain relievers like tramadol, buprenorphine, and morphine may be prescribed for more severe pain. These medications can be highly effective, but they also have potential side effects, such as sedation and respiratory depression. Your veterinarian will carefully assess your pet’s condition and medical history to determine the most appropriate pain management plan. Regular monitoring is essential to ensure the medication is effective and to detect any potential side effects early on. Be sure to follow your veterinarian’s instructions carefully and never adjust the dosage without their approval.
Over-the-Counter Options (Buffered Aspirin, etc.) and Proper Dosage (Consult Vet)
While prescription medications are generally the safest and most effective option for pain relief, there may be limited circumstances where your veterinarian recommends using buffered aspirin for pain management in dogs. *Never* give aspirin to cats, as they lack the enzymes needed to metabolize it properly, making it highly toxic. If your veterinarian approves the use of buffered aspirin for your dog, it’s crucial to follow their dosage recommendations precisely. Aspirin dosage is based on your dog’s weight, and even a slight overdose can cause serious side effects, such as stomach ulcers and bleeding. Always use buffered aspirin to minimize the risk of stomach irritation. Monitor your dog closely for any signs of adverse reactions, such as vomiting, diarrhea, loss of appetite, or dark, tarry stools. If you notice any of these signs, discontinue the aspirin immediately and contact your veterinarian. Remember, buffered aspirin is only a temporary solution for mild pain and should not be used long-term without veterinary supervision. Always consult your veterinarian before administering any over-the-counter medication to your pet.
Tools of the Trade: Essential Instruments for Pet First Aid
Beyond basic supplies, certain instruments are crucial for accurate assessment and treatment. Investing in quality tools, designed for pet care, ensures effectiveness and minimizes the risk of injury during a stressful situation.
Digital Thermometer: Taking Your Pet’s Temperature Accurately
A digital thermometer is indispensable for determining if your pet has a fever or is experiencing hypothermia. Use a rectal thermometer specifically designed for pets (never a glass thermometer due to the risk of breakage). Lubricate the tip with petroleum jelly or KY Jelly. For dogs and cats, gently insert the thermometer about one inch into the rectum. Hold it in place until you get a reading. A normal temperature for dogs and cats ranges from 100.5°F to 102.5°F (38.1°C to 39.2°C). Record the temperature and the time it was taken, as this information is valuable for your veterinarian. Note: Never attempt to take a pet’s temperature if they are aggressive or in severe pain; prioritize safety.
Pitfall: Using a human oral thermometer. These are inaccurate for rectal use and can be easily broken. Actionable Step: Purchase a dedicated pet rectal thermometer and practice taking your pet’s temperature when they are healthy to acclimate them to the process.
Tweezers and Tick Removers: Safe and Effective Removal Techniques
Tweezers are useful for removing splinters, thorns, or other foreign objects from your pet’s skin. However, for tick removal, a specialized tick remover tool is highly recommended. These tools are designed to grip the tick close to the skin and remove it completely, reducing the risk of leaving the head embedded, which can lead to infection. Follow the instructions on the tick remover carefully. After removal, disinfect the bite area with antiseptic solution and monitor for signs of infection or Lyme disease. Check your pet regularly for ticks, especially after spending time outdoors; consider using a product for “Best Flea & Tick Prevention for Pets This Season”.
Pitfall: Squeezing the tick’s body during removal, which can release harmful bacteria into your pet’s bloodstream. Actionable Step: Purchase a dedicated tick remover and learn how to use it properly before tick season.
Blunt-Ended Scissors: Cutting Bandages and Removing Obstructions
Blunt-ended scissors are essential for safely cutting bandages, gauze, and removing fur that may be obstructing a wound. The blunt ends minimize the risk of accidentally cutting your pet’s skin. Keep the scissors clean and sharp for efficient cutting. They can also be used to carefully trim matted fur around wounds, allowing for better cleaning and healing. Be extremely cautious when using scissors near your pet’s skin, especially if they are moving or agitated.
Pitfall: Using regular pointed scissors, which can easily puncture or cut your pet’s skin. Actionable Step: Invest in a pair of blunt-ended scissors specifically for pet first aid.
Beyond the Basics: Additional Items to Consider for Specific Pets
While a general first aid kit is suitable for most pets, certain species require specific items tailored to their unique needs. Consider your pet’s species and common health issues when customizing your kit. This section details additional supplies for avian, reptile, and small mammal companions.
Bird First Aid: Styptic Powder and Crop Needles
For birds, styptic powder is crucial for stopping bleeding from broken blood feathers or nail trims. Apply a small amount to the affected area and apply gentle pressure. A crop needle (feeding tube) may be necessary for administering fluids or medications to birds that are not eating or drinking. However, crop feeding should only be performed by experienced individuals or under the guidance of a veterinarian, as improper technique can cause aspiration pneumonia. Consider having a resource about “Bird Grooming Tips: Keeping Your Feathered Friend Healthy” on hand for proper feather and nail maintenance.
Example: Imagine a parakeet named Pip accidentally breaks a blood feather. Without styptic powder, the bleeding could be difficult to control, leading to significant blood loss and stress.
Reptile First Aid: Calcium Supplement and Antibiotic Ointment
Reptiles often suffer from calcium deficiencies, so including a calcium supplement in your first aid kit is beneficial, especially for species prone to metabolic bone disease. Antibiotic ointment can be used to treat minor skin abrasions or scale injuries. Consult with a veterinarian before using any medications on your reptile, as some products can be toxic. Maintaining proper humidity and temperature in your reptile’s enclosure is crucial for preventing health problems. A resource like “SEO Automation: Daily Blogs, Top Rankings” could give you more ideas.
Example: A bearded dragon named Lizzy develops a minor skin abrasion after rubbing against a rough surface in her enclosure. Applying antibiotic ointment after cleaning the area can help prevent infection.
Small Animal First Aid: Syringe Feeding and Electrolyte Solution
Small animals like rabbits, guinea pigs, and hamsters are prone to gut stasis, a condition where the digestive system slows down or stops. Syringe feeding with a slurry of critical care formula can provide essential nutrients until veterinary care can be obtained. Electrolyte solutions can help rehydrate small animals suffering from diarrhea or dehydration. Always consult with a veterinarian before administering any medications or treatments to your small animal.
Example: A guinea pig named Gus stops eating and becomes lethargic. Syringe feeding with critical care formula can provide essential nutrients and fluids until a veterinarian can diagnose and treat the underlying cause.
Assembling Your Kit: Storage and Organization Tips for Easy Access
The effectiveness of a pet first aid kit hinges not only on its contents but also on how readily you can access them during an emergency. Proper storage and organization can save precious minutes when every second counts. A well-organized kit will also encourage you to use it!
Choosing the Right Container: Size, Durability, and Water Resistance
Select a container that is large enough to hold all your supplies without being overly bulky. A durable, water-resistant container is essential to protect the contents from damage and moisture. Options include plastic storage boxes, tackle boxes, or even repurposed medical bags. Consider a container with compartments or dividers to help organize the items inside.
Pitfall: Using a flimsy bag that tears easily or a container that is too small to accommodate all necessary items. Actionable Step: Measure the dimensions of your supplies and choose a container that provides ample space and adequate protection.
Labeling and Organizing Items for Quick Retrieval
Clearly label each item in your kit and organize them logically. Group similar items together, such as wound care supplies or medications. Consider using clear plastic bags or containers to further organize smaller items. A printed or handwritten list of the kit’s contents, attached to the inside lid, can be invaluable during an emergency.
Example: Label separate bags for “Wound Cleaning,” “Bandaging,” “Medications,” and “Tools.” This allows for quick retrieval of the necessary items without having to rummage through the entire kit.
Keeping Your Kit in a Central and Accessible Location
Store your pet first aid kit in a central, easily accessible location in your home, such as the kitchen, pantry, or hallway closet. Ensure that everyone in the household knows where the kit is located. If you travel frequently with your pet, consider keeping a second, smaller kit in your car. Avoid storing the kit in humid or extremely hot environments, as this can damage certain supplies.
Pitfall: Storing the kit in a hard-to-reach location, such as the attic or basement, or in a place where it is likely to be forgotten. Actionable Step: Choose a prominent and easily accessible location for your pet first aid kit.
Maintaining Your Pet First Aid Kit: Expiration Dates and Replacements
A pet first aid kit is only effective if its contents are in good working order. Regular maintenance, including checking expiration dates and replacing used or damaged items, is crucial for ensuring that your kit is always ready when you need it most.
Creating a Schedule for Checking Expiration Dates
Establish a regular schedule for checking the expiration dates of medications, antiseptic solutions, and other perishable items in your kit. A good rule of thumb is to check your kit every three to six months. Mark the date on your calendar or set a reminder on your phone to ensure that you don’t forget.
Pitfall: Neglecting to check expiration dates, which can lead to using ineffective or even harmful medications. Actionable Step: Create a recurring calendar reminder to check the expiration dates of all items in your pet first aid kit.
Replacing Used or Expired Items Promptly
Whenever you use an item from your kit, replace it as soon as possible. Expired medications should be discarded properly (consult your veterinarian or pharmacist for disposal guidelines). Damaged or contaminated supplies should also be replaced immediately. Make a list of frequently used items to streamline the restocking process; “Essential Pet Supplies Checklist: Never Run Out Again” might offer ideas.
Example: After using antiseptic wipes to clean a wound, immediately add them to your shopping list to ensure you have a replacement on hand.
Restocking and Reorganizing After Each Use
After using your pet first aid kit, take the time to thoroughly restock and reorganize it. This will ensure that everything is in its proper place and that you have all the necessary supplies for the next emergency. This is also a good opportunity to check expiration dates and discard any expired items.
Pitfall: Failing to restock and reorganize after each use, which can lead to disorganization and missing supplies during a future emergency. Actionable Step: Make it a habit to restock and reorganize your pet first aid kit immediately after each use.
First Aid Training for Pet Owners: Empowering Yourself with Knowledge
Being prepared for pet emergencies requires more than just a well-stocked first aid kit. Proper training equips you with the knowledge and confidence to act swiftly and effectively in critical situations. Pet first aid courses teach you how to assess your pet’s condition, administer basic life support, and handle common injuries until you can reach a veterinarian.
Benefits of Taking a Pet First Aid Course
A pet first aid course offers invaluable skills. You’ll learn how to check vital signs (heart rate, respiration, temperature), recognize signs of distress (“Is My Pet Sick? Early Warning Signs You Should Know” and perform CPR. Furthermore, courses cover topics like wound care, managing poisoning, addressing choking, and stabilizing fractures. Perhaps most importantly, training provides a sense of calm and control, reducing panic in stressful situations. Consider this: Without proper training, you might inadvertently worsen an injury. A course teaches you safe handling techniques.
Online and In-Person Training Options
Pet first aid courses are available in both online and in-person formats. Online courses offer flexibility and convenience, allowing you to learn at your own pace. However, in-person courses provide hands-on practice with instructors who can offer immediate feedback. When choosing a course, ensure it’s certified by a reputable organization like the American Red Cross or a qualified veterinary professional. Look for courses that include practical demonstrations using pet mannequins or, ethically, with your own healthy, willing pets under strict veterinary guidance.
Practicing Basic First Aid Techniques on Your Pet (Under Supervision)
Practice is crucial. Under the guidance of a veterinarian or certified instructor, gently practice techniques like bandaging, splinting, and checking vital signs on your healthy pet. This familiarizes both you and your pet with the procedures, minimizing stress during an actual emergency. Never attempt invasive procedures on your own without professional training and guidance. For instance, inserting a thermometer incorrectly can injure your pet. Instead, practice safe and accurate handling. Remember that your pet’s anxiety can escalate rapidly in an emergency. A calm and confident approach, fostered by practice, can make a significant difference.
Talis Us: Your Partner in Pet Wellness and Emergency Preparedness
At Talis Us, we understand that your pets are family. That’s why we’re committed to providing not only premium pet supplies but also resources to help you keep them safe and healthy. Our carefully curated selection of first aid supplies is designed to meet a variety of needs, from minor scrapes to more serious injuries.
Explore Our Selection of Premium Pet First Aid Supplies
We offer comprehensive first aid kits for dogs, cats, birds (“Bird Health Checklist: Signs of a Happy Bird” and reptiles, as well as individual items to replenish your existing kit. Each kit is thoughtfully assembled with high-quality materials and detailed instructions. When selecting a kit, consider the size and type of your pet, as well as your lifestyle. A large dog that enjoys hiking will require a more robust kit than a small cat that primarily stays indoors.
Featured Products: Wound Care Kits, Digestive Support, and More
Our wound care kits include antiseptic solutions, bandages, gauze pads, and other essentials for cleaning and protecting minor injuries. We also offer digestive support products to help manage upset stomachs and diarrhea, a common issue in pets. For birds, we stock specialized wound care products appropriate for delicate feathers and skin (“Bird Grooming Tips: Keeping Your Feathered Friend Healthy” Our reptile kits contain items appropriate for treating scale injuries and other specific needs.
Expert Advice and Resources for Pet Owners
Talis Us is more than just a store; we’re a resource for pet owners. Our website features articles and guides on various aspects of pet health, including first aid, nutrition, and behavior. We also partner with veterinarians and other pet professionals to provide expert advice and support. We believe that informed pet owners are better equipped to provide the best possible care for their animals.
Important Disclaimer: First Aid is Not a Substitute for Veterinary Care
While a well-stocked first aid kit and proper training are essential, it’s crucial to understand that first aid is not a substitute for professional veterinary care. First aid is intended to stabilize your pet and provide temporary relief until you can get them to a veterinarian. Always seek veterinary attention for serious injuries or illnesses.
Knowing When to Seek Professional Help
It’s critical to recognize when a situation requires immediate veterinary intervention. First aid is about stabilizing the animal for transport. If you are unsure of the severity of your pet’s condition, it is always best to err on the side of caution and consult a veterinarian. Delaying treatment can have serious consequences.
Recognizing Critical Symptoms That Require Immediate Veterinary Attention
Certain symptoms warrant immediate veterinary attention. These include: difficulty breathing, severe bleeding, loss of consciousness, seizures, suspected poisoning, inability to urinate or defecate, signs of extreme pain, and significant trauma (e.g., hit by a car). Any sudden change in behavior or condition should also be evaluated by a veterinarian.
Keeping Your Veterinarian’s Contact Information Readily Available
Keep your veterinarian’s phone number and address readily available – programmed into your phone and posted in a visible location at home. Also, research the location and contact information for the nearest emergency veterinary clinic. During an emergency, every second counts, and having this information readily available can save valuable time.
Being prepared with the right knowledge, supplies, and a clear understanding of when to seek professional help can make all the difference in a pet emergency. At Talis Us, we’re here to support you every step of the way, providing the resources and products you need to keep your beloved companions safe and healthy.
Black and white photography promises seriousness without risk, coherence without effort, and intention without proof. In an era where color is technically trivial and visually unforgiving, monochrome offers shelter. It removes variables, postpones judgment, and replaces unresolved structure with borrowed authority. It is like dimming the lights in a messy room: the objects do not move, but the problems stop being visible. If an image cannot survive color, was monochrome ever a choice?