The analog photography revival is real. You can see it at every wedding reception with a disposable camera basket, every college campus where students dangle point-and-shoots from their wrists, every TikTok tutorial on how to load a roll of Kodak Gold. But if you follow the money instead of the aesthetics, you’ll find two radically different stories unfolding under the same “film is back” umbrella.
Building a DIY backdrop wall gives you professional studio flexibility without the expense of commercial systems. This rolling backdrop measures 3 meters wide by 2.6 meters tall, accommodating up to three people while remaining mobile enough to reposition throughout your studio. The dual-sided design provides two different backdrop colors, and adjustable wheels allow the wall to sit completely flush with the floor for seamless wide-angle photography.
Why Commercial Backdrop Walls Fall Short
Commercial backdrop systems cost $1,000-$3,000 and often lack the one feature that matters most: the ability to sit flush with the floor. Traditional backdrop stands, seamless paper systems, and even expensive mounted walls create visible gaps between the background and floor. These gaps destroy the illusion of a seamless environment and make wide-angle shots impossible without showing the transition.
A DIY backdrop wall on wheels solves this critical problem. The adjustable wheel system allows the wall to lower completely to the ground, creating a true floor-to-wall connection. You get professional results that commercial systems can’t deliver, at a fraction of the cost.
Planning Your DIY Backdrop Wall Size
Determine dimensions based on your studio space and shooting needs. This project uses a 3-meter width by 2.6-meter height, large enough for group shots of up to three people but compact enough to maneuver in a standard studio. Consider your ceiling height, available floor space, and typical subject arrangements when planning your DIY backdrop wall.
Larger dimensions provide more flexibility but reduce mobility. Smaller sizes move easily but limit shooting options. The 3×2.6 meter size represents a practical balance for most studio photography applications, including portraits, fashion work, and small group sessions.
Materials for Your DIY Backdrop Wall
Gather these materials before starting construction:
Frame Materials:
Construction wood (2×4 or similar) for the main frame
Cross braces (same construction wood)
Wood screws for frame assembly
6 plaster boards (3 per side)
Mobility System:
4 heavy-duty adjustable wheels
Triangle support structures for wheel mounting
Mounting hardware for wheels
Finishing Materials:
Joint compound for plastering
Sandpaper (various grits)
Primer
Two colors of wall paint
Paint rollers and brushes
Heavy-duty adjustable wheels are crucial for this DIY backdrop wall. They must support the weight of the frame and plaster boards while allowing height adjustment so the wall can be lowered to floor level. This feature is what separates your DIY backdrop wall from inferior commercial options.
Step 1: Build the Wooden Frame
Construct a rectangular frame from construction wood measuring 3 meters wide by 2.6 meters tall. Cut wood pieces to length and assemble them using wood screws. Create corners first, ensuring they’re square and sturdy. This frame provides the backbone for your DIY backdrop wall.
Use a level throughout assembly to keep the frame square. Uneven frames cause problems later when mounting plaster boards and affect how the finished wall sits on the floor. Take time to get measurements and angles correct during this foundational step.
Step 2: Add Cross Braces for Strength
Install cross braces throughout the frame to strengthen the structure and provide mounting points for plaster boards. Position braces vertically and horizontally across the frame interior. These prevent warping and give plaster boards a solid backing across their entire surface.
Space cross braces approximately every 60-80 centimeters for adequate support. The exact spacing depends on the plasterboard size and frame dimensions. More bracing creates a sturdier DIY backdrop wall but adds weight. Balance strength against mobility needs for your specific studio situation.
Attach three plaster boards to one side of the frame. Position boards carefully to minimize gaps between them. Screw boards directly to the frame and cross braces using appropriate fasteners. Plasterboard screws work best as they sit flush with the surface.
Repeat the process on the opposite side of the frame with three more plaster boards. This dual-sided construction gives your DIY backdrop wall two usable surfaces for different backdrop colors. The sandwich construction also adds rigidity to the overall structure, making it more durable than single-sided alternatives.
Step 4: Build Triangle Wheel Pedestals
Create triangular support structures on each side of the frame base. These triangles distribute weight from the frame to the wheels evenly. Build them from the same construction wood, creating stable bases that extend from the frame’s bottom.
The triangle design is crucial because it prevents the DIY backdrop wall from tipping when rolled. The wide base created by the triangle shape provides stability while maintaining a relatively compact footprint when the wall is stored upright.
Step 5: Install Heavy-Duty Adjustable Wheels
Attach four heavy-duty adjustable wheels to the triangle bases. Position wheels at the corners for balanced weight distribution. The adjustable height feature is critical – it allows you to raise the DIY backdrop wall for moving, then lower it completely to the floor for shooting.
This is the secret that makes your DIY backdrop wall superior to commercial systems. When lowered, the wall sits directly on the floor with no gap. When raised, you can roll it effortlessly to any position in your studio. Test the adjustment mechanism to ensure smooth operation before proceeding.
Fill gaps between plaster boards with joint compound. Apply compound with a putty knife, pressing it into seams and smoothing it flush with the board surface. This creates seamless transitions between boards so the finished wall appears as one continuous surface.
Allow the first coat of joint compound to dry completely. Apply additional coats as needed, feathering edges for smooth transitions. This plastering process takes patience but is essential for professional results on your DIY backdrop wall. Multiple thin coats work better than single thick applications that crack when drying.
Step 7: Sand to Perfection
Once the joint compound is completely dry, sand the entire surface smooth. Start with medium-grit sandpaper to level high spots and blend plastered seams. Progress to fine-grit sandpaper for a smooth finish, ready for painting.
Pay special attention to seams between plaster boards. These should be completely invisible after proper sanding. Run your hand across the surface to detect any remaining irregularities. Smooth surfaces photograph better and prevent shadows from uneven texture during studio lighting setups.
Wear a dust mask during sanding, as plaster dust is unhealthy to breathe. Work in a ventilated area and clean up dust thoroughly before painting.
Step 8: Prime for Perfect Paint Adhesion
Apply primer to both sides of your DIY backdrop wall. Primer seals the plasterboard surface, provides uniform absorption for paint, and improves final color accuracy. Use a roller for large areas and a brush for edges and corners.
Allow primer to dry according to the manufacturer’s specifications. Proper drying prevents paint problems later. Primed surfaces also reveal any remaining imperfections you can address before final painting. Touch up any rough spots with additional sanding before proceeding.
Step 9: Paint Both Sides Different Colors
Choose two different colors for your DIY backdrop wall sides. Select colors that complement skin tones and work with your typical photography style. Neutral colors like gray, beige, or muted earth tones provide versatility for various shoots.
Apply the first color to one side using a paint roller. Work in even strokes for uniform coverage. Allow the first coat to dry, then apply a second coat for full color saturation. Repeat the process on the opposite side with your second color choice.
Two coats of paint ensure solid color coverage without thin spots that show through in photographs. Quality paint designed for walls works best, providing durability against the inevitable bumps and scrapes of studio use.
Here’s where your DIY backdrop wall destroys commercial alternatives. When ready to shoot, lower the adjustable wheels until the wall sits completely on the floor. This floor contact eliminates the gap that ruins seamless backgrounds in most studios.
You can now shoot wide-angle portraits showing the floor-to-wall transition without visible seams or gaps. The solid contact also stabilizes the wall, preventing movement during shoots. Models can even lean against it without the wall shifting.
When finished shooting, raise the wheels to lift the DIY backdrop wall off the floor. Roll it to storage or reposition it for the next setup. The mobility transforms how you use studio space, allowing quick changes between different shooting scenarios.
Color Selection Strategy
Choose backdrop colors that work with your primary photography subjects. Neutral tones provide maximum versatility for portrait work. Skin tones photograph well against grays, taupes, and muted earth colors. These colors don’t cast color spills onto subjects like bright or saturated backgrounds might.
Consider having one neutral side and one accent color side. The neutral side handles general shooting while the accent color provides creative options for specific projects. Popular combinations include gray and beige, white and charcoal, or taupe and sage green.
Test colors with your typical lighting setup before committing to large quantities of paint. Small sample boards help visualize how colors will photograph under your studio lights. What looks good to the eye doesn’t always photograph the same way.
Using Your DIY Backdrop Wall for Maximum Impact
Position your rolling backdrop wall anywhere in the studio. The wheels make repositioning easy for different lighting arrangements or to accommodate various shooting spaces. Experiment with placement to find optimal positions for your typical setups.
The dual-sided design means you can flip the wall to change backdrop colors in seconds. No need to change paper backdrops, swap out cloths, or rearrange your studio. Simply rotate the DIY backdrop wall 180 degrees, and you have a completely different look.
For group shots, position subjects directly against the wall. The seamless floor connection means you can shoot from low angles without showing the typical backdrop stand legs or gaps. This opens up creative composition options impossible with traditional backdrops.
Maintenance and Long-Term Care
Inspect your DIY backdrop wall periodically for damage. Touch up paint as needed to maintain a clean appearance. Scuff marks and scratches happen with regular studio use, but quick touch-ups keep the wall looking professional.
The plasterboard surface repairs easily if damaged. Fill holes or dents with joint compound, sand smooth, and repaint the affected area. This repairability makes your DIY backdrop wall a long-term studio investment rather than disposable equipment.
Change colors whenever your photography style evolves, or the client’s needs shift. Simply sand the existing paint lightly, apply fresh primer, and paint new colors. The solid construction supports unlimited repainting without degradation.
Storage and Space Management
When not in use, roll your DIY backdrop wall to a storage location against a studio wall. The relatively compact footprint when standing upright minimizes floor space consumption. The dual-sided design means one wall provides two backdrop options, reducing the number of backdrops needed in your studio.
If you have limited storage space, the vertical orientation works perfectly. The wall stands against any available wall without taking up valuable floor area. Lock the wheels when stored to prevent accidental rolling.
Consider building multiple backdrop walls in different sizes for various applications. Smaller versions work for product photography while larger versions handle full-body portraits. The construction process remains identical regardless of dimensions.
Why This Beats Commercial Systems
Commercial backdrop systems with a comparable size cost $1,000-$3,000. Most still create that problematic floor gap. Your DIY backdrop wall solves this issue while costing around $200 in materials. That’s 80-90% savings for superior functionality.
The dual-sided color design provides twice the versatility of single-color commercial backdrops. The adjustable wheels enable the crucial floor contact that expensive systems can’t match. The solid construction rivals or exceeds commercial quality when built properly.
You also gain the ability to customize dimensions precisely for your space. Commercial backdrops come in fixed sizes that might not fit your studio perfectly. Your DIY backdrop wall fits exactly where and how you need it.
Professional Photography on a DIY Budget
Creating a rolling DIY backdrop wall gives you studio equipment that outperforms commercial options costing ten times more. The seamless floor contact enables professional photography techniques impossible with traditional backdrop systems. The dual-sided color design doubles your backdrop options without doubling your space requirements.
The mobility transforms the studio workflow, allowing quick reconfigurations for different shoots. You gain the flexibility to adapt your space rather than working around fixed backdrops. This DIY backdrop wall proves that smart construction and quality materials create professional tools that rival anything you can buy.
We use cookies to ensure that we give you the best experience on our website. If you continue to use this site we will assume that you are happy with it.
And I made a very short Mindfulness film complete with music. All 30 seconds! Enjoy and meditate, but be quick!
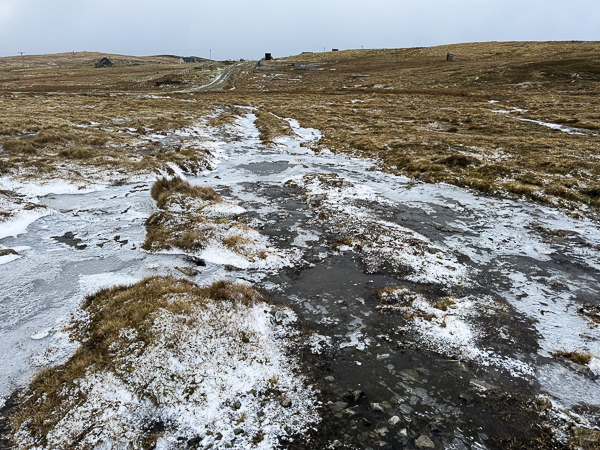
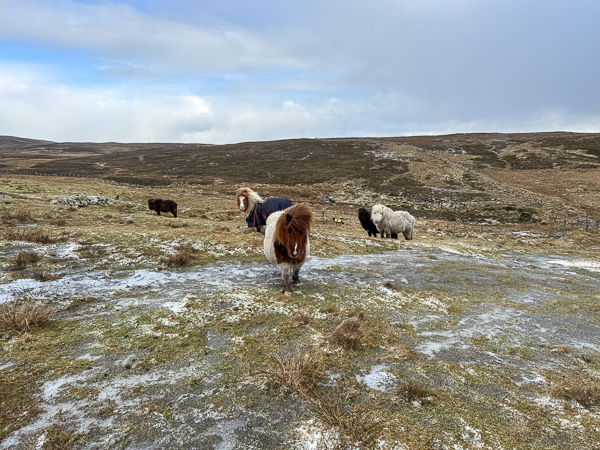
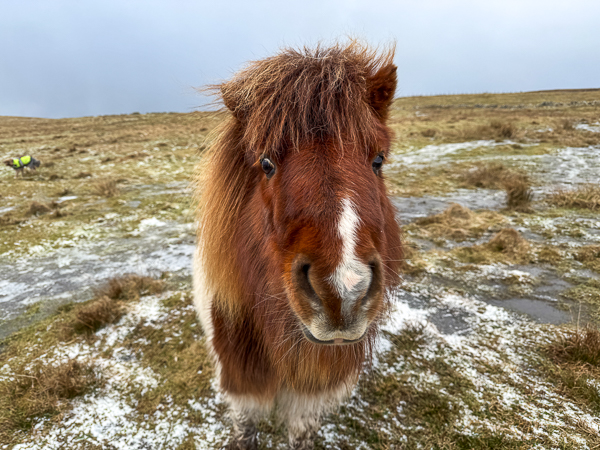
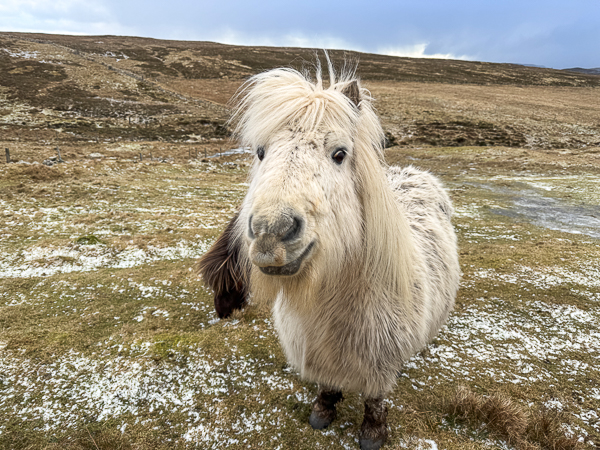
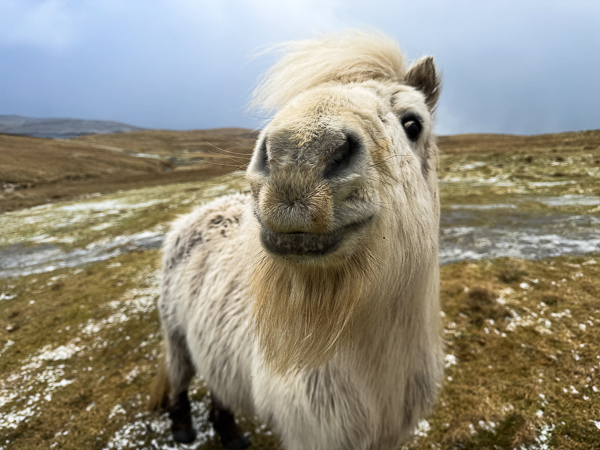
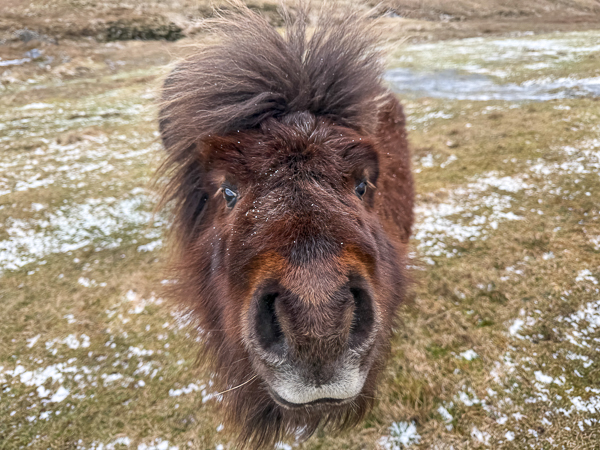
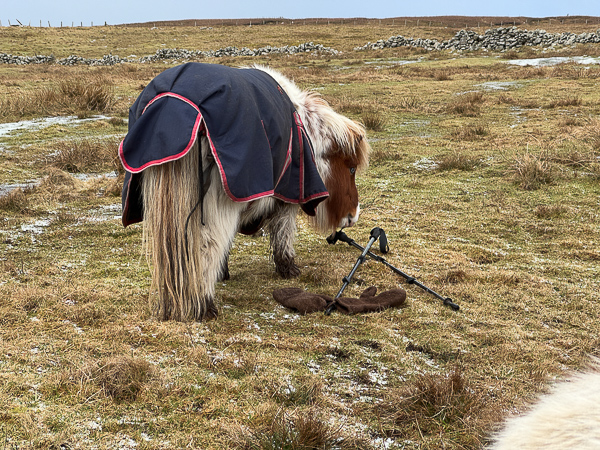
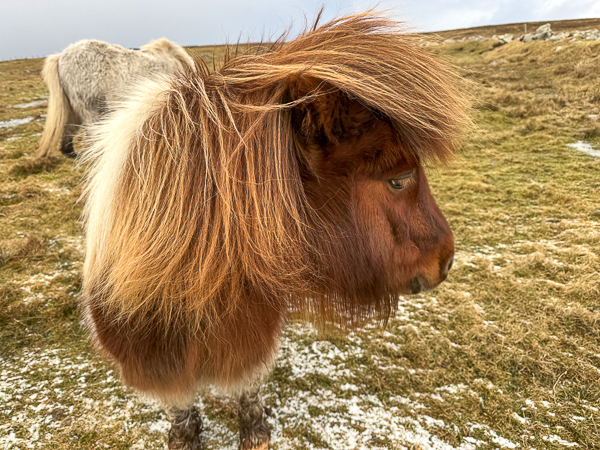
Since seeing the soggy little Shetland ponies in their shed yesterday, you will be pleased to know that they all dried off and floofed up a treat.
I went to see them on my dogwalk.
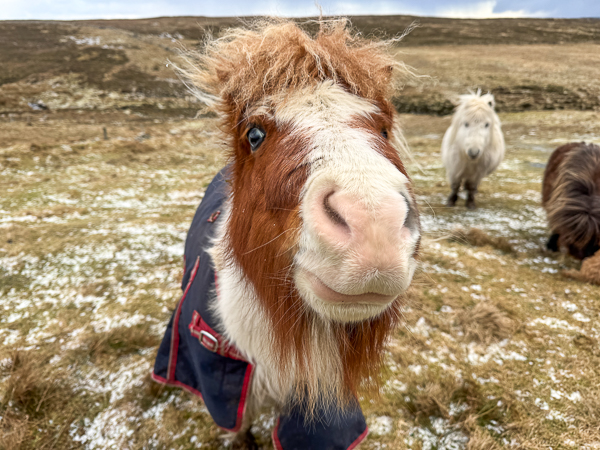
Tiddles and his rug are one. I doubt we will get that off him before July.
I went round feeling for ribs and I can confidently say no one has any.
The ponies’ long coats are keeping them insulated and warm, as it should be.
(Silver gave me a knowing look)
Newt got a kiss on his nosey.
And Waffle was being aloof because I hadn’t brought any treats. Unlike Gussie, I don’t travel with snacks.
Meanwhile, Tiddles had wandered over to look at my mittens (made from ‘Bert wool, which are invaluable this time of year – I love them) and to pick up my walking sticks (again, invaluable). I had put them down to take the photos.
And then I could see that Albie was thinking he could go and do some investigation, so I quickly scuttled back to pick everything up before they were destroyed. I found pony spit on my mittens, thank you Tiddles.
But it was good to see everyone happy and healthy. There is enough grass in their huge field so they don’t get any extra hay (I don’t want hay addicts). Their breakfast is obviously enough to keep body and soul together. Daisy is also keeping me on track. She is much tougher (and wiser) than me. I am a soft touch.
Like this:
LikeLoading…
Discover more from My Shetland
Subscribe to get the latest posts sent to your email.
African Penguin chicks require a great deal of care and attention when they are this young, even being hand-fed a nutritious concoction dubbed a “fish milkshake” by the Zoo’s birdkeepers! These shakes don’t really have any milk at all, but rather a mixture of fish, krill, vitamins, and supplements that will nourish the chicks as they grow! In a few months, these small but mighty chicks will transform into the characteristically vocal African penguins loved dearly by the Cincinnati Zoo community.
Mexico Proposes Rollback Of Vaquita Protections, Pushing The Species Closer To Extinction – World Animal News
The fate of the vaquita hangs in the balance as Mexico considers regulatory changes that could determine whether this critically endangered species survives. Conservationists around the world are sounding the alarm, warning that the decisions made now may mark a turning point in the fight to save the world’s rarest marine mammal.
According to the Animal Welfare Institute (AWI), Mexico is on the brink of publishing new rules that will significantly weaken protections for the vaquita porpoise, the world’s most endangered cetacean, potentially leading to the extinction of the species. The Intergovernmental Group on Sustainability in the Upper Gulf of California, a multi-agency organization created to oversee implementation of measures to protect the vaquita, held a pivotal meeting recently, proposing new regulations that could eviscerate established protections.
During the meeting, the Mexican government announced new proposed regulatory measures on gillnets, the principal threat to the vaquita. According to a 2025 survey, only seven to ten vaquitas may remain in the wild. These porpoises are highly vulnerable and easily become entangled and drown in gillnets, which are used illegally to catch totoaba (a large fish), shrimp, and other marine species in the Upper Gulf of California.
The new measures would amend Mexican regulations published in September 2020 which, if fully implemented and enforced, were generally considered the best chance for saving the vaquita from extinction. However, the country has never comprehensively enforced those 2020 regulations and is now considering changes that include reducing the size of the area where gillnets are prohibited by 85%, allowing the use of gillnets in known vaquita habitat, and permitting fishing at night.
“The new measures proposed today represent Mexico’s white flag of surrender to the cartels and fishers who have, for decades, overseen or participated in illegal fishing of totoaba and other species, nearly causing the extinction of the vaquita,” said DJ Schubert, senior wildlife biologist with the Animal Welfare Institute (AWI). “Mexico’s failure to enforce existing regulations—and now, its attempt to roll them back—is sentencing this beloved porpoise to extinction.”
AWI has long fought, alongside other animal welfare and conservation organizations, for Mexico to crack down on illegal gillnet use and take the protection of the vaquita seriously. In the face of today’s challenging developments, the organization urges the Mexican government to reconsider this potentially disastrous proposal.
If these proposed changes move forward, the consequences could be irreversible. With only a handful of vaquitas remaining in the wild, the world is watching to see whether Mexico will strengthen its commitment to enforcement and protection, or allow the species to vanish forever.
This story was originally shared on The Animal Rescue Site. Submit your own rescue story here. Your story just might be the next to be featured on our blog!
After losing our girl of 13 years, my husband and I decided to look for another rescue. We went to CARE in Liberty, NY. We were looking for an older dog who wasn’t too big.
Pamela Leconey
However, a very skinny, undernourished, sad, dejected-looking dog was brought out to meet us. We were told he came from a really bad environment and would need lots of patience.
Here’s the surprising part: he was 6½ months old and already 40 pounds.
My husband looked at my face and knew that Rooster—his name—was coming home with us no matter what we had originally agreed on.
Pamela Leconey
Fast forward two months: Rooster has emerged into a healthy, happy, very energetic puppy. He has been tough to train, but he makes progress every day. He is so loving and so thankful.
Pamela Leconey
I can’t imagine life without our Rooster boy. He has filled this house with joy—and plenty of mischief.
Story submitted by Pamela Leconey
This story was originally shared on The Animal Rescue Site. Share your very own rescue story here!
The laughter doesn’t stop with the winners of the Nikon Comedy Wildlife Awards 2025. Now, it’s your turn to join the fun. The Comedy Wildlife Awards 2025 People’s Choice voting is officially open, and one lucky voter will win £500 (around $670) just for taking part.
With just two weeks left before the STERNA People’s Choice Award closes, the organizers are calling on wildlife lovers everywhere to cast their vote and spread the word. If you’ve already fallen in love with the dancing gorilla who stole the overall title, or if another finalist made you laugh out loud, now’s your chance to help crown the crowd favorite.
How To Vote In The Comedy Wildlife Awards 2025 People’s Choice
Voting in the Comedy Wildlife Awards 2025 People’s Choice is simple and takes just a minute:
• Head to the People’s Choice Award vote page • Pick your favorite image from the 43 finalists • Enter your email and tick the box if you’d like to join the prize draw
That’s it. Voting closes at midnight on March 1, 2026, so don’t wait too long to choose your winner.
Among the finalists are some of the most joyful and perfectly timed wildlife moments of the year. From expressive primates to mid-air bird drama and wonderfully awkward animal encounters, the shortlist proves once again that nature has impeccable comedic timing.
I personally love that some photo contests offer public voting, especially this one that’s loved by so many people. While judges focus on technical excellence, storytelling, and originality, we tend to vote with our hearts. And in the case of the Comedy Wildlife competition, we can simply cast our vote based on which photo caused us to chuckle or downright laugh out loud. Isn’t it wonderful?
With 43 finalists competing for the Comedy Wildlife Awards 2025 People’s Choice title, every vote helps shape the final result. Whether you’re drawn to clever timing, hilarious expressions, or pure chaotic wildlife energy, there’s bound to be one image that makes you grin.
And remember – one randomly selected voter will walk away with £500. Not bad for a minute spent enjoying some of the funniest wildlife photography of the year.
WANDRD’s Latest Backpacks Hold Big Kits for Under $350
Subscribe here for an ad-free experience!
We use cookies to ensure that we give you the best experience on our website. If you continue to use this site we will assume that you are happy with it.
Mobile Crossbody Multi-Strap, Mobile Crossbody Strap and Mobile Cuff Deliver Secure, Low-Profile Carry for Phones and Compact Cameras
Peak Design introduces three new additions to its Mobile ecosystem: the Mobile Crossbody Multi-Strap, Mobile Crossbody Strap, and Mobile Cuff. Designed for creators, travellers and everyday users alike, the Mobile Strap Family combines secure carry, refined aesthetics and effortless functionality, all built around Peak Design’s innovative Micro Anchor™ connection system.
Whether worn crossbody or around the wrist, each strap is engineered to keep your phone or compact camera secure, accessible and tangle-free, without adding bulk.
Mobile Crossbody Strap
Mobile Crossbody Multi-Strap
The Mobile Crossbody Multi-Strap is a versatile, low-profile strap designed to carry your phone, keys and small essentials securely. Built with Peak Design’s Micro Anchor™ system, it offers faster, stronger and more intuitive attachment, complete with a built-in swivel to prevent twisting.
A custom-machined and anodized aluminum carabiner holds up to three Micro Anchors™ and locks shut for added security. The custom-developed rope strikes a careful balance between strength, comfort and stretch, while sleek glass-reinforced nylon hardware enables quick length adjustments.
Key Features:
Compatible with any Peak Design case, Apple iPhone 17 case and small point-and-shoot cameras, plus third-party cases using the included adapter Mobile Crossbody Multi-Strap
Secure aluminum carabiner with locking mechanism
Adjustable length from 90cm to 168cm
Fair Trade Certified and backed by a lifetime guarantee
MSRP: $59.95 – Available in Black, Ocean and Ibis.
Mobile Crossbody Strap
Mobile Crossbody Strap
The Mobile Crossbody Strap delivers a streamlined 2-point carry solution for phones and compact cameras. Designed for all-day wear, it combines minimalist aesthetics with practical security.
Like the Multi-Strap, it features the Micro Anchor™ system with integrated swivel functionality to prevent twisting. The strap also includes accessory loop hardware, allowing users to convert to single-point carry or stow the strap on their body when the device is detached.
Key Features:
Works with Peak Design and Apple iPhone 17 cases, plus third-party cases via included adapter Mobile Crossbody Strap
Adjustable from 88cm to 164cm
Lightweight, comfortable rope construction
Fair Trade Certified with lifetime guarantee
MSRP: $49.95 – Available in Black, Ocean and Ibis.
Mobile Cuff
Mobile Cuff
For those who prefer wrist carry, the Mobile Cuff offers simple, durable and low-profile drop protection. Ideal for phones, point-and-shoot cameras or any small device with a strap connection point, the Cuff automatically cinches down on the wrist in the event of an accidental drop.
Constructed from ultra-durable woven rope, the Mobile Cuff incorporates aluminum adjustment and stopper hardware to customise fit and minimum loop size. The Micro Anchor™ system ensures fast and secure attachment with the same anti-twist swivel design found across the range.
Key Features:
Compatible with Peak Design cases, Apple iPhone 17 cases and third-party cases via adapter Mobile Cuff
Automatically self-cinching for drop protection
Adjustable loop sizing
Fair Trade Certified and backed by a lifetime guarantee
MSRP: $29.95 – Available in Ibis, Black and Ocean.
Built for Everyday Creativity
The Mobile Strap Family reflects Peak Design’s ongoing commitment to thoughtful design, durability and sustainability. Each product integrates seamlessly into the broader Peak Design Mobile ecosystem, offering users secure, flexible carry options without compromising style or performance.
With quick-connect Micro Anchors™, premium materials and Fair Trade Certified manufacturing, these new straps provide practical protection for modern devices while maintaining the clean, refined aesthetic Peak Design is known for.
For full specifications, color and more, please visit the Peak Design Website.